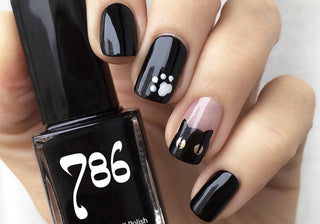
As we all know, we paint our nails based on the season. In the spring you can wear pastels and in the summer you can wear the brightest color your heart wants. Fall and winter are typically when you start to see women wearing darker nail polish colors such as dark nudes, blues, browns-basically any color, but the darkest version of it. In the past few years, we have also seen the rise of black nail polish as a trend, whether is it a matte black look or some fun nail art with it, black nails are always in during this time of year.
What could be even better than a standard black manicure? Adding some adorable nail art of course! While we can't get over how classy black marble nails look or how sophisticated and chic a black matte look is, we can't pass up an opportunity to have our nails include an adorable kitty on them. Check out these tips for how to create the CUTEST of cute nail art designs created by @nailsteria.


 Still need a little more help creating this design? No worries! We have a video tutorial to help you. Check out our YouTube video on this Cute Black Cat Nail Art Design.
 Make sure to let us see your adorable nail art creation as well! Tag us on Instagram @786cosmetics or use the hashtag #786cosmetics and we will be sure to check out your work!
Step 1:
- Start with your ring finger. Instead of painting black nail polish over all of the nail, just paint a thin, little half circle at the tip of the nail. This will become the kitty's face in the black cat nail art.
- Once dry, add a second thin coat of black nail polish over the little half circle you made. This way the kitty's face will be all black and not have any see-though parts in it.
Step 2:
- Now you can go back to the rest of your nails and paint a thin coat of black nail polish over the entire nail. You will add some nail art to the middle finger nail, but you don't need to worry about that until later.
- Once dry, add a second thin coat of black nail polish over these same nails to make sure they are not see-through as well.

Step 3:
- Go back to your ring finger and, using a small brush (make sure it is VERY small!), create two little triangles around the top of the half circle you created. These will become the kitty's ears in the black cat nail art design.
- No worries if these aren't super neat! Some cats have fluffy ears so if you mess up, just pretend its kitty fluff! Once dry, add a second coat if you think it is necessary-you may not need this second coat.

Step 4:
- If you have a circular, metal nail art tool you can grab that for this part. If not, just use the small brush again, but make sure to clean off all of the black nail polish from before.
- Create two little gold dots on the kitty's face with gold shimmer nail polish. These will be the kitty's eyes! These can be circular if you want or in smaller slits like cat eyes-but the circles might make the kitty look even cuter!

Step 5:
- Once the gold dots have dried, use the small brush again to create one very thin vertical line inside the gold dots. These are the inside parts of the kitty's eyes. Now the kitty's face is done! Nice!

Step 6:
- Now for the nail design for the middle finger. Take that circular, metal nail art tool again if you have it (if not use a small brush again!), and create three small dots with white nail polish that are so close to each other they touch. There should be no open space between these dots. This create the middle part of a cat's paw print.

Step 7:
- Above the three touching circles, make four little white dots around the top to make the cute little bean-toes of a kitty!

Step 8:
- Add a thin coat of a nail polish top coat and you are all done! Admire your adorable kitty and wait until your friends notice your cute nails!
 Still need a little more help creating this design? No worries! We have a video tutorial to help you. Check out our YouTube video on this Cute Black Cat Nail Art Design.
 Make sure to let us see your adorable nail art creation as well! Tag us on Instagram @786cosmetics or use the hashtag #786cosmetics and we will be sure to check out your work!


Mehreen Iqbal
Thank you so much! The cat designs are so cool 🐈⬛