Nail art always looks beautiful on other people, but it is not something that is easily done. -Enter our Easy Nail Designs tutorial!-
Typically you would need about seven different nail polish colors, a base coat and a top coat. Oh, and don't forget the extra glitter polishes and your fancy brushes and stamping plate! It is just too much work sometimes, and it can take an hour to complete. No one has that much time on their hands to create an intricate nail art looks that might come off in the next week.
If you are still looking to jazz up your standard nail polish look without needing too much experience under your belt, here are some easy nail designs for people of all skill levels of painting their nails. From trendy ombre nails to a chic marble look, we will detail the simple steps to create these easy nail designs.
For the unskilled artist:
Ombre Nails Pictured (left to right): Samarkand, Chefchaouen, Lagos, Kuala Lumpur
Ombre nails are the new trend for this year, and we can't get enough of them! Ombre nails are the simplest form of nail art but it almost isn't nail art at all! This easy nail design can be made with just using five different nail polishes that you have on hand that are in the same color family. What do we mean by this? Ombre nails tend to look the best when the nail polishes that are all of the same color such as all shades of red, all shades of pink, or in this case, all shades of blue!
What you'll need:
5 different nail polishes within the same color family (all blues, all pinks, etc.)
Easy steps to create Ombre Nails:
- Optional: Apply the 786 Cosmetics Nail Rescue Primer in one thin coat over all nails. This primer will help strengthen your nails underneath the nail polish and help to make your nails strong and healthy!
- Choose your five nail polish colors all within the same color family. (The image shown is just using four colors with the same color on the thumbnail and the pointer fingernail, which is also an option!)
- Paint each nail with one thin coat of the color, remembering to switch nail polishes for each nail.
- Once fully dry, apply the second coat of each color on your fingernails..
- Optional: Finish off your ombre nails with a top coat and enjoy your trendy, easy nail design!
For the slightly daring nail artist:
Accent Nail Abstract Design
- Optional: Apply the 786 Cosmetics Nail Rescue Primer in one thin coat over all nails.
- Apply 2 coats of the same color to your thumb, pointer finger and pinky. We chose Kashmir, our fave pink-ish shade! Leave your middle finger and ring finger bare (786 Cosmetics Nail Rescue Primer makes for a great canvas for these two fingers!).
- Stripe nail colors one by one on your accent nails, allowing each polish to dry before moving on to the next. When applying these colors, make sure to wipe off any excess polish from the brush, as you won't need much product. These lines aren't meant to be perfect, so feel free to make them different thicknesses or lengths.
- Once your patches of color have dried, grab your nail dotting tool! Use your shimmer color (our is a gold shimmer, Dubai) to apply dots randomly over the patches of color. Again, this is abstract, so it doesn't have to be perfect.
- Finish off the look with a quick coat of clear polish and you're done! Pretty easy, right!?!
For the upcoming YouTube nail artist:
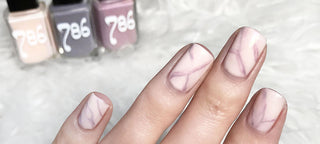
Marbled Nail Art 786 Cosmetics nail polishes featured in this look: Abu Dhabi (white), Lahore (grey) and Cairo (brown shimmer)
What you'll need:
Three nail polish colors, a thin nail art brush, and a disposable cosmetic sponge.
Marbled nail art is a very classy and chic look that can be worn any time of the year, but looks particularly in-season during the fall. This look will take a little more skill than the ombre nail art, but even if you don't have the skills yet, try it out! The more you practice nail art designs the better you will get, and this easy nail design look is a good design to start off with.
Steps to create Marbled Nails:
- Optional: Apply the 786 Cosmetics Nail Rescue Primer in one thin coat over all nails.
- Apply 1-2 coats of the nail polishes you would like to be the base of the nail art design. Pictured, paint Abu Dhabi fully on the thumbnail and middle fingernail and half way up the pointer fingernail. You can use a piece of scotch tape to create the straight line. Then paint Lahore half way up the ring fingernail, again using scotch tape if you would like for the straight line. Paint Cairo on the full pinky fingernail.
- Use the cosmetic sponge to randomly dab Cairo onto the white nails that were painted with Abu Dhabi. Make sure to dab lightly or the nail polish would be too thick. This step is too add depth and shouldn't look perfect-so don't worry about how it looks just yet! Using the small nail art brush, fill in the dab marks to look like thin lines. They don't need to be perfect either, because real marble has naturally curvy lines!
- As seen in the photo here, you can use Cairo and the small nail art brush to make thin, straight lines above the nail polish on both the pointer fingernails and the ring fingernails.
- Optional: Once completely dry, apply one thin coat of a top coat and enjoy your chic, easy nail design!